Méthode
Mac-TripleBoot-Windows7-Ubuntu
(Rédigée en 2012)
Installation
de MacOSX.6 SnowLeopard + Windows 7 pro + Ubuntu Ubuntu 11.10
(Oneiric Ocelot)
sur MacBookPro 8Go RAM neuf acheté juin 2011: un "MacBook Pro 15-inch,
2011" modele 8,2
Avec carte WIFI Broadcom BCM43xx.
À partir de l'article "MacOS X, Windows et Linux sur le même Mac"
du numéro 107 de la revue "
Avosmac"
Windows 7 obligatoire car les drivers fournis par Apple pour les
MacBook Pro 2011 sont pour Windows 7, il n'y a pas de drivers Windows
XP.
Format NTFS obligatoire pour Windows 7. (FAT 32 pas possible)
Ubuntu: Voir:
https://help.ubuntu.com/community/MacBookPro
https://help.ubuntu.com/community/MacBookPro8-2/Oneiric
Installation MacOSX.6 SnowLeopard
- Normalement
- Mettre à jour MacOS
- Redémarrer
Installation rEFIt sous MacOSX
"rEFIt is a boot menu and maintenance
toolkit for EFI-based machines like the Intel Macs.
You can use it to boot multiple operating systems easily, including
triple-boot setups with Boot Camp.
It also provides an easy way to enter and explore the EFI pre-boot
environment."
- Télécharger rEFIt 0.14 (6.5M Mac disk image) depuis:
http://refit.sourceforge.net/
- Installer rEFIt: Voir:
http://refit.sourceforge.net/doc/c1s1_install.html
- 2 x clic rEFIt-0.14.dmg.
- 2 x clic “rEFIt.mpkg” package.
- Personnaliser -> cocher en plus rEFIt File System Drivers (pour
ext2, ext3... Linux)
- Follow the instructions and select your MacOS X installation volume
as the destination volume for the install.
- Ça installe un dossier efi dans la racine du disque dur de démarrage
- Redémarrer
- Redémarrer une 2e fois si rEFIt n'apparaît pas au démarrage
- En cas de problème
In case your MacOS X installation on
the hard disk no longer boots, you can boot from the MacOS X Install
Disk
(hold down the ‘C’ key while booting)
and run “Startup Disk” from the “Utilities” menu.
et, au pire, pour supprimer rEFIt:
To get rid of rEFIt, open the “Startup
Disk” preference pane and select “MacOS X” as the operating system to
boot. This will re-bless your MacOS X volume and instruct the firmware
to boot from it. Then rename or delete the “efi” folder.
- Connecter le Mac a Internet par câble
- BootCamp
- Sous MacOSX Lancer
/Applications/Utilities/Boot Camp Assistant.app
Choisir la taille de la partition NTFS. (20 Go mini car Windows
7
occupera 15 Go mini + Linux 20Go).
Je prends 100Go, il reste 400Go pour MacOS
- Sous MacOSX quand Boot Camp Assistant le demande, insérer le DVD
d'installation de Windows 7 Pro et lancer...
- Sous Windows...
... Choisir:
Personnalisez... Installer une nouvelle copie de Windows
Ou souhaitez-vous installer Windows ?
Disque 0 Partition 3: BOOTCAMP
Options de lecteurs avancées -> Formater -> OK -> Suivant
... Patience
- Laisser Windows redémarrer
- Redémarrer (grâce à rEFIt) sous Windows
- ...
- Éjecter le CD d'installation de Windows
- Insérer le DVD d'installation de SnowLeopard livré avec le Mac
- "Bienvenue dans le programme d'installation de BootCamp"
- Installer... (Les drivers propres au MacBookPro s'installent...)
- ...
- Redémarrer (grâce à rEFIt) sous Windows
Sous Windows...
- Éjecter le CD d'installation de SnowLeopard
- Installer Antivirus etc...
- Mettre à jour Windows
- Redémarrer... etc... etc…
Installation Linux Ubuntu 11.10
(Oneiric Ocelot)
" Unable to find a medium containing a
live file system "
" I got the install working by dd'ing the install iso onto a usb
flashdrive, then using a cd burned with the iso to boot the flashdrive"
…
burn the flash drive (diskN)
…
Finally, insert the cd and usb flash drive into the Mac, hold alt to
get the boot menu... "
http://ubuntuforums.org/showpost.php?p=11026696&postcount=14
Oui fonctionne
- English
- Choisir "Install Ubuntu"
- ...
- Choisir Pays, Clavier: France Macintosh, etc...
- Where do you want to put Ubuntu ...?
-> Install them side by side, choosing between them each startup
Prends 46.5 GB sur la partition de Windows, ce qui laisse 54.2 GB pour
Windows 7
- Resizing partition...
- ... Install...
- Restart Now
- Le CD d'installation de Ubuntu est éjecté

Vérification Triple Boot
Redémarrer... -> rEFIt -> Choisir
Ubuntu -> GRUB -> Choisir Ubuntu
Propose aussi MacOS X (32-bit) MacOS X (64-bit) Windows
OK Démarrage Ubuntu
Redémarrer... -> rEFIt -> Choisir Windows -> GRUB ->
OK Démarrage Windows
Redémarrer... -> rEFIt -> Choisir MacOS ->
OK Démarrage MacOS
Fin Installation Ubuntu:
Redémarrer sous Linux Ubuntu
Si Ubuntu 11.04 (natty) ou 11.10 (oneiric) installé:
- Pour avoir le bureau Classic:
En haut à droite -> Menu de démarrage/extinction -> System
Settings -> System →
-> Login Screen -> Unlock -> Select Ubuntu Classic
et Log Out… et Log In
Si problème: pas de son au démarrage, pas de son sous Firefox etc…
Essayer de connecter un casque audio.
Si problème: pas de WIFI, etc…
Réglages Audio sous Linux
Réglage du son avec alsamixer ->
Terminal ->
g@gp:~$ alsamixer
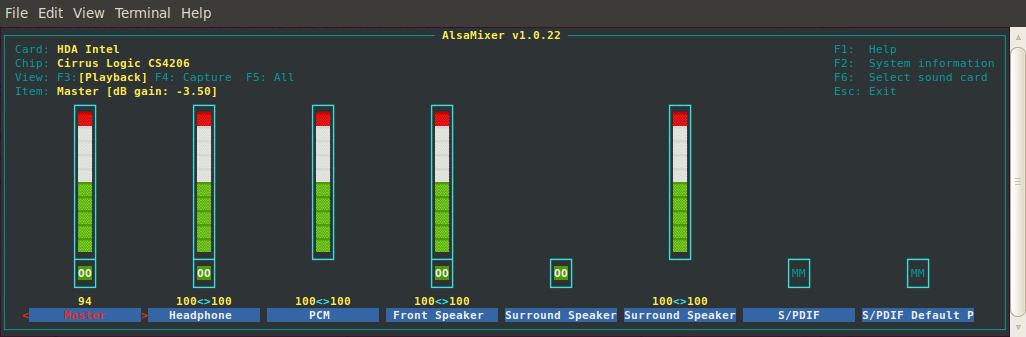
MM = Mute
00 = OK
Passer de l'un a l'autre en tapant M
Augmenter les niveaux
fn + F6 -> Choisir carte son
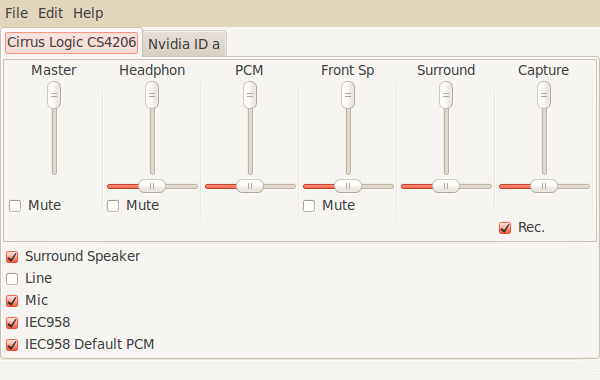
Ou installer GNOME ALSA Mixer -> Terminal ->
sudo apt-get install gnome-alsamixer
-> GNOME ALSA Mixer apparaît dans le
menu Appplications/Sound & Video
Entrée Audio:
Menu System -> Preferences ->
Sound -> Input -> Choisir "a device for sound input"
Si le microphone interne ne fonctionne pas -> Terminal ->
g@gp:~$ gksudo gedit
/etc/modprobe.d/alsa-base.conf
Add the following line to the end of the file:
options snd-hda-intel model=mbp55
Save the file.
Redémarrer
Le son des Haut-parleurs internes fonctionne alors !
GNOME ALSA Mixer a changé:

Le microphone interne fonctionne :
Menu System -> Preferences -> Sound -> Input ->
…
Si c'était à refaire... (10 2013)
page mise à jour 23 2 2023